Wednesday, January 30, 2013

The Rancher's Daughter Quilt Along (Block 4 Barnyard Spools)


 (A Whoops!! Any of you who downloaded my button, could you please go back and reload it. Some of the code was missing and the old one takes you to a non-existing page. So, so sorry!!)
Barnyard Spools
(Seeing I wanted to get a block to you this week, and Monday's post was about the Quilt Along...
here it is now!)
Growing up breakfast and bible study was at 7 a.m.
If that wasn't early enough....
we had to go down before that and milk goats, feed chickens
and make sure the 2 day old baby calves that had been pulled from their mothers
were either bottle fed or fed by the goats.
Dad built stalls where the goat went in one way,
and then two calves went in the opposite way on both sides of the goat and fed.

When Dad wasn't looking....
we found these huge spools that I guess housed electrical wire of some sort,
and sat for a spell.
Now that didn't happen too often.
Dad had the old eagle eye!

So in naming this block I remembered these huge ole things in the barn.

Here's the scoop:

A Cut (24) 1 1/2" Squares (White) 
B Cut (7)  1 1/2" Squares (Red)
C Cut (7) 1 1/2" Squares (Green and White Print)
D Cut (7) 1 1/2" Squares (Red and White Print)  
E Cut (7) 1 1/2" Squares (Green) 

I've found out that it helps if I create a drawing on graph paper
to follow from for these blocks.
That way I don't get any block mispositioned. 

I then line up the cut pieces beside the appropriate Letter
and work from there.

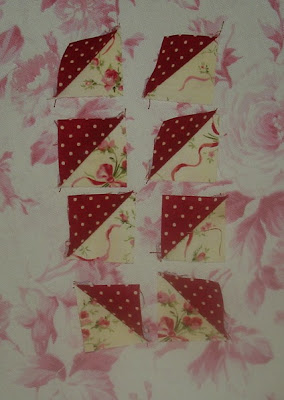
First of all create half square triangles from A/B squares
    
 If you need detailed instructions for the HST's

Next, lay out the three rows making sure everything is positioned correctly!
This is critical because these little babies can get turned around pretty easily, look right and are so not right!!
Sew rows together.
Make sure as you go along that seams on each row are pressed to one side and the next row to the opposite
so when piecing them together they nestle in there together perfectly.
Sew the 3 rows together.
Stitch the other 3 spools in the same manner.
Position them according to the photo below.
Your Barnyard Spool Block is done!


And going with the theme....
a pic from up in New York when we went to our Lost Soldier Boy's funeral,
Ken and I stopped in at a Farm Sanctuary...
just so I could pet some goats! Love my goats!


Happy Stitching My Ranchin' Buddies!


Monday, January 28, 2013

Rancher's Daughter Quilt Along - Join Now!!

Oh Goodie, it's here!!

My new blog button for our Quilt Along!

~If you'd like to post it on your blog you can copy the code on the upper right side of my blog~

I'm so excited about this ladies.
I've been up in the middle of the night thinking of the stories I can tell about 'Ranch Life',
i.e.....raising a pig in my bathtub....you know, stuff like that!

And through it all we will get a quilt finished!

So here's the particulars:

~Each Monday I will post a new block~
~These are all 6" blocks~
~Tutorials will be Added to Each Blog Posting~
~And on some Fridays I will Post a Linky Party
for you all to share your work with each other
and possibly tell some stories of your own!~
 
In November I will post a setting solution for the quilt!
So that by Christmas, you will have a quilt to either give away or keep.
Something to think about, if you are wanting a new Christmas Quilt for yourself too.
I'm doing one set of my blocks in Christmas colors.

And that's it! 
Keeping it sweet and simple!

Here are links to:
Block 1 
Block 2 
Block 3 

I sure hope you all will join in! Let your friends know too, and let's just see how many we can get to join us!

Gotta get sewing.....

See ya soon....

P.S. If you want to know who created my button it is Karen Valentine
over at 
Valentine Design!
Check out her work ... it is fabulous!
She can help you out if you need some blog work done!

Thursday, January 24, 2013

Rancher's Daughter Quilt Along Block Tutorial (Block 3)

Happy Thursday everyone!
Hope you're having a wonderful week!

Here's the latest block in our Quilt Along 

(First of all I must apologize for the picture quality. I finally realize it isn't my lighting, I need a new camera!)
So it's on the list!

This was a really fun block to make.
But beware....if you don't want to do a lot of ripping out (like I did!)
make sure your pieces are always lined up and pointing in the direction they are supposed to be!


Here's the cutting directions:
 A Cut (8) 1 1/2" squares (red/white polka dot) 
B Cut (8) 1 1/2" squares (yellow print)
C Cut (4) 1 1/2" X 2 1/2" rectangles (red/white polka dot)
D Cut (4) 1 1/2" squares (red print) 
E Cut (4) 1 1/2" squares (yellow print)
F Cut (4) 1 1/2" X 2 1/2" rectangles (red print)
G Cut (4) 1 1/2" squares (yellow print)
H Cut (4) 1 1/2" squares  (red print)
 First of all I lay out all of the pieces to keep it straight:

For A/B units put one of each right sides together, 
draw a line diagonally down the center of one
and then sew together on that dotted line. Trim up to 1/4" past seam and press open.

Do the same with E/D squares but then put the four together to form center pinwheel unit.
 

 Position into pinwheel and stitch together using 1/4" seam:

Turn these pieces over and unstitch the few stitches at center
and it will help to make your pinwheel to lay flat:
  Now your center piece is done.

Take C and F rectangles and sew together lengthwise:
 
   Make sure all units are lined out and all points are positioned correctly:
 Sew A/B Units to corner G units.
Sew A/B units to inside H squares.

 Stitch these together:
 Sew these units to the center C/F unit creating top and bottom rows:
 Stitch center pinwheel unit to two side C/F units to create center row.
Sew all rows together:
 Hope you enjoyed ladies! 
There's a lot of pieces to this block but I think you will really
be pleased with the final result!

Oh yes...
and here's a new pic of baby Kash (Tory's little boy)
 I feel like this is all of you ladies grandbaby,
seeing so many of you invested time in praying for this child of mine in her hard times!

God is good!! So good!!

Love to all....
  P.S. I have a professional working on a blog button for me, so hopefully I will be posting that at the first of the week, plus more refined details for this Quilt Along!
So hang in there with me gals!! 


P.S.S....
I'm hanging out over at Heidie's Friday Night Sew In...
tomorrow night. So come on over and sew with us all...

 Click Here to Check it Out!

Wednesday, January 16, 2013

Warning! Unhappy Post today...

I'm going to keep this short and to the point my friends,
first apologizing for posting anything negative on my blog.

I am only here to encourage you,
so please forgive me.

Due to some unpleasantness I have had to rename the project we are working on together. It is now called The Rancher's Daughter!
I will be posting block tutorials mostly in public domain, a few of my own and will create some individual projects with them as well as one final quilt.

The name comes from me actually being a Rancher's Daughter!

I was raised on a big Registered Hereford Cattle Ranch just outside of Palm Springs, California. Yeah...I know all about cowboys, hay fields, laying pipelines in the pastures, barns, pigs, goats, chickens, etc! I will be adding my little stories of life on the ranch with the blocks. 

I hope you all aren't too disappointed! Let me know what  you think!   

Tuesday, January 15, 2013

Chat on the Farmhouse Porch


What a fun Chat I came across today!

Everyday Ruralty
 " I think we should put on the tea kettle and the coffee pot, then have a fun time talking." the blogger says.

These are the questions to be answered....

What was your favorite game as a child?
I loved playing Life and Jacks.

Have you ever had your own business? (home business, a shop, Etsy, lemon-aid stand, etc)

My first business was when I was about 7 years old, I went door to door selling boxes of cards to my neighbors. What a hoot now when I think back about it.

I also sold Discovery Toys when the kids were small,
had my own 'Nursery Designs by John'aLee"

Interior's by John'a Lee

Showcase Interiors
started out all of these by sewing curtains, nursery sets, pillows, etc. I specialized in those really ruffly curtains of the 80's.    

Oh yes....and can't forget I had my own Cinnamon Roll shop in Dallas, Texas right down the street from American Airlines headquarters. 

How's your spelling?

I always won the spelling bees in school. I LOVE spelling. Love playing Words with Friends online. Last night I was looking up the 'word for the day' on Dictionary.com. Okay...I know...I need help. 

 How are you about going to the dentist?

Come on....does anybody ever say, "Oh yippee....I get to go to the dentist today???" 

 Do you enjoy board games?

I do. Love playing Scrabble with all of my kids and their mates! After first playing with the adorable guy my daughter married, he went into  Google Search and put in "How do I beat my mother-in-law at Scrabble?"

And he got answers! That was the funny part! They actually told him how to do it! 

I happily play Checkers with my oldest grand daughter. She used to get mad that I wouldn't let her win. I told her, 
"Em, I wouldn't be doing you any good if I let you win. I will show you 'how' I win, and I will  teach you everything I know, but I won't just let you win."
And every time I come...she pulls out the Checker Board!   

So what are your answers ladies?
These questions brought back some delightful memories for me!

Make sure to check out the blog this came from!

Happy Tuesday to you all...

Monday, January 14, 2013

The Rancher's Daughter Quilt Along - Churn Dash Block Tutorial

This is the block I used for designing my first quilt back in 1998, so it's pretty special to me!

And it's a fun one to make!
You can see....I couldn't just stop at one!

So here goes....
The pic of the tutorial block. Sorry this isn't better...I took several but it was a rainy day out!
 
You will need:
A - (4) 2 1/2" Squares ... for outside corner half square triangles.
B - (4) 2 1/2" Squares... for outside corner half square triangles.
C- (4) 2 1/2" X 1 1/2" Rectangles...for outside middle squares.
D - (4) 2 1/2" X 1 1/2" Rectangles...for outside middle squares.
E - (1) 2 1/2" Square...for center square.
 A and B Cuts
Put A and B squares right side together, draw a line diagonally down the middle. 


Chain piece through machine, stitching on line.
 Trim up to 1/4" past seam.
Press open.
Take D and C Rectangles, place wrong sides together and stitch down the length, 1/4".

Now assemble block as below:

 
 Sew the 3 left side squares together as shown below, doing the same for the middle squares and right side squares.
Then sew each of these 3 units together.
 
Wala.....
your block is complete!

Hope you enjoy!

I am going to try to post once a week on Wednesday
with a new block tutorial.

Have a great week everyone!
      

Thursday, January 3, 2013

Tutorial-Piecing Grandmother's Flower Garden with Mylar Templates!!


Just in case you missed it....
I know we have a lot of new readers out there,
so I thought I'd re-post my popular tutorial on how to use mylar templates
for piecing hexagons together!

Hexagon Tutorial with PLASTIC TEMPLATES

Finally....my 'Hexagon' tutorial
everyone has been asking for...


 So here goes...
 I do a lot of my sewing in the car while traveling...
so I rough cut my pieces out while in the car as well.
I cut the templates 3/8" larger all the way around the template.
Most people tell you to cut them 1/4" larger...
but with the plastic templates...
if they are cut out like that and are not dead on center...
the templates will start to pop out.
They tell you to cut 1/4" larger because
they are figuring on most people hand quilting this project when it is completed...
and any bigger than that leaves an extra layer of fabric to quilt through.
My solution....go in and trim up any excess.
Also...if you cut it at a 1/4" larger and don't have it completely centered...
you will have weak points in your quilt...
where it isn't quite a 1/4" seam.
Place a pin through the middle of the hole and back through
to hold the piece while you work.
Fold over the first corner until you have a crisp edge
and tack two tacking stitches.
(Just a basic whip stitch)
Now with the same needle and thread
travel over to the next point...
fold it over crisply...
and take two stitches at that corner...
Continue around until you come to the last point
before the edge where you started.
At this point take out the pin...
I then kind of pull it tightly
so as to pull out the indentation
from the pin holding the fabric and template together.
Go to the place you started...
take one more stitch
and knot off.


Now butt two templates up side by side
and whip together about 1/8" apart
starting at the very points of each hexagon...

DO NOT HOLD THEM LIKE THIS!!!
NO! NO! NO!

Now I know I may offend other bloggers and hexagon hand piecers out there...
but this is my 'humble' opinion.
I travel across the country doing shows
30-36 weekends a year...
and I see all kinds of quilts.
99% of Hexagon Quilts....
have 'stitches' showing through to the front.
To me...
if one is going to go to all of this handwork...
the last thing you want...
is for your stitches to show through!

This is why I LOVE the plastic templates.
If you place them side by side and stitch them
instead of like the previous picture...
your stitches will NOT show through!


Add another petal to flower center and starting at the top like shown in the picture below...
whip stitch all the way down that template
as well as the previous petal you attached.
The striped piece is the Flower Center
Continue until all flower petals are added.


When you get to the last one...
it is a little  bit funky to hold it...
but this is what I do....


I stitch the petal side to the center of flower
and continuously through the 
adjoining petal.


Then I go back and stitch the sides of the first and last petal together...
finishing the flower.


Wa la....
Your flower is finished...
and you can start adding the pieces all the way
around it to make a path...
The templates pictured here are 1" Hexagons

Now to take out the templates so you can reuse them...
You must always keep the templates on the outside
edge of the piece you are working on at all times... 


Once you have completely enclosed a template
all the way around with templates
whipped stitched on each edge..
you then can pull out that middle template.


I go to each one of my basting threads
that I originally secured the plastic template with...
and clip them.
This will release the template so you 
can gently take it out...
Now on this piece...
I can go take out all of the templates
except for the raspberry colored hexagons
on the outer edge...


And then you have your final unit
all completed...


These little templates are addicting.
I love them because 
they travel so easy.


Also...with the PLASTIC templates...
once you invest in them...
you never have to purchase them again...
or keep remaking them like the paper ones.


If you  would like to order some to try out...
CLICK HERE!!!

Hope this helps ladies!

Until Next Time....